1. Add connecting/snap-to points to any shape in Word

    In Microsoft Word there is no way you can add your own connecting points to shape through the interface, because the connecting points are an integral part of the shape (as explained by a MS MVP), unless I use Visio. But I just wanted to add connecting points. So... let's add some connecting points on our own.

    Firstly, in order for the connecting point to be enabled, you have to draw the shape INSIDE a drawing canvas. So make a drawing canvas first, by going to Insert tab, Shape.


    Draw a rectangle and say you want to snap a line to the rectangle, you see that the connecting points are very limited.


    To add more connecting points, we add curves to the line. This is because in curves, you can add points, which acts as our connecting points.

    Draw a 'straight' curve by clicking one edge and double clicking the other end to draw a 'straight' curve.
    Right click the curve and you can see that you can edit points.
    Click on edit points and you're in edit points mode. In this mode, right click on any point on the curve that you want to add point.

    No sweat.

    Try snapping a line to the rectangle.
    Great.

    To make sure that the curve and rectangle are 'together', hold CTRL and select the curve and the rectangle, right click one of the shape and group them together via Grouping>Group.

    Now you realize that, the curve method is only useful for 'adding' points to straight vertices, so how about other types of shapes?

    Say you want to add a connecting point to the side of a 'moon shape' first make a circle.

    Right click it and format it.


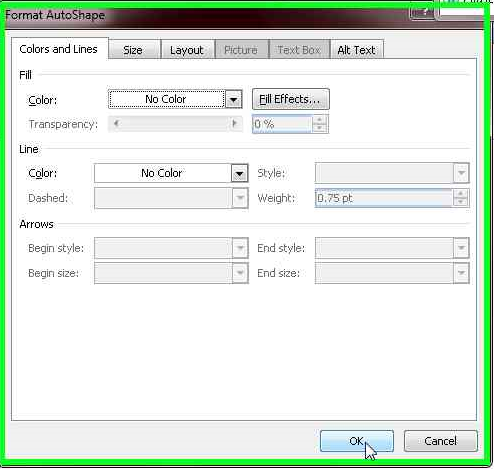
    and put everything as No Color.
    Now that you have an invisible circle, scale it to very small size and then move it to the point of the vertice where you want to add point, such that the vertice is tangent to the circle.

    Wohoo.
    Connecting points are useful when drawing lines to shapes because the line is 'stuck' to the shape when you move the shape around it is still connected. This is very useful say when you are drawing a circuit diagram with Word.
    Continue reading »
  2. Virtual Router/AP on Windows without extra software


    Virtual Router Switch uses netsh commands to control wireless hosted network feature on compatible Windows 7 computers. Due to use of native commands, no third party software needed, just download and run.

    The script can be downloaded here : vr.bat (right click and 'Save link as..')

    To enable Internet Connection Sharing on the virtual router, follow steps below

    1. Type "ncpa.cpl" in the search box in start menu and press enter.

    2.  At the Network Connections window, right click on the network adapter that has internet and select 'Properties'
    3. Click on 'Sharing' tab
    4. Tick the 'Allow other network users ...' and under Home networking connection, select the virtual AP you created.

    5. Click OK

    To unshare the connection, untick the 'Allow other network users ...'
    Continue reading »
  3. Remove that annoying low frequency chirp.

    If you listen to music on good speakers or headphones, you will, at times notice and hear chirping or ringing sound during quiet passage with bass or low frequency, such as a beat. It is annoying, but the problem does not lie in your sound card or headphones or sound system, it is Windows's fault. This problem is apparent in Windows Vista and up, as it's due to the misconfiguration of default audio settings and in my opinion shitty DSP of audiodg.exe.

    Anyway to get rid of the chirp, go to audio properties by right clicking the speaker icon on the task bar and select 'playback devices'.


    Double click on speakers and on the 'Speakers Properperties' dialog select the advanced tab. Under default format change the format to '16 bit, 44100hz (CD quality)'. Then click apply.


    You then ask why down grade to CD quality when DVD quality is better? No, higher sampling rate or numbers does not equal to better sound quality. It is a placebo increase in sound quality and introduces unwanted noise like the chirping. You have to understand that most audio you listen to are 44.1khz sampling rate and increasing the sound card's sampling rate isn't going to improve that.
    Continue reading »
  4. Alternate version of tracert on Windows (cmd)


    The tracert program that came with Windows seems to be useless at times. Just look at the shot on the right.

    Wrote a .bat script to overcome this problem, here.

    Feature of my version of tracert
    • Option for super fast tracing
    • Works 95% of the time
    Note: If you see duplicate address for a consecutive hop, it means it found a hidden router (which does not ping back)
    Continue reading »
  5. Dynamically reload a display driver without rebooting

    There are times when reloading a display driver is necessary, like say you crashed it and the driver stays in 'Safe Mode' where the graphics card is throttled to lower clock frequency and a reboot is necessary to snap the graphics back to full performance.


    This is quite troublesome when you are determining ceiling overclock frequency for your card as you have to reboot everytime the driver crash. A driver reload is faster than reboot as shown here.


    Driver reloaded.


    Continue reading »
  6. Control a laptop with fried graphics card/monitor.

    You turn on your laptop and what you get is that blank screen with colour slideshow and nothing else. You tried plugging it to an external monitor, but to no avail - 'no input signal'. You tell yourself :"weird? the harrdrive is reading and the logon chime.."

    Jump straight to steps
    Your laptop is indeed working, just that the monitor/interface has gone south. Naturally, you could try to tear your laptop apart and reseat the monitor connector or graphics card, check the board if you're using integrated graphics. If it worked after that, congrats, but if it doesn't, then.. This problem usually arises from broken graphics controller, and the color slideshow you see is probably the 'test mode' of the laptop monitor, because there is no output to the monitor.

    Sigh. Usually this problem can be mitigated on a desktop by replacing a new graphics card, but for a laptop is quite expensive since the graphics controller is integrated to the motherboard, WHAT TO DO? Buying an external USB video controller can do the job, they are cheap, or if your laptop has an external PCI port it's even better, because you can install an external desktop graphics card. But if you are not really into doing those things, and is planning to recover data or wants to access the laptop urgently, it is possible.. The Windows Remote Desktop Connection is one of the ways, but setting it up and getting it to work is almost impossible blindfolded, so there must be something better..


    UltraVNC makes a little software called 'Single Click' where you can preconfigure a Remote Desktop Server and run it on the broken laptop so you can access it on another computer.

    Instructions

    This step by step instruction helps you to control the broken laptop visually on another computer.
    Firsly make sure both computers are connected to a LAN, WLAN or some local IP network and can see each other on the network.

    1. Download UltraVNC on a working computer and install it. Run the vncviewer.exe with the -listen switch by creating a shortcut of the vncviewer.exe, right-click-properties it and adding "-listen 5500" to the end of the 'target' like this


    2. Download this, and open a file called 'helpdesk.txt' in the archive. Between [HOST] and [TEXTTOP] delete everything else and insert

    LAN connection
    -connect XXX.XXX.XXX.XXX:5500 -noregistry

    where XXX.XXX.XXX.XXX is the IP of the working computer.


    3. Save the text file, then delete a file called 'rc4.key' in the archive, then visit this site http://support1.uvnc.com/cgi-bin/upload4.pl and upload the .zip archive. The userid is 'foo' and the password is 'foobar'. Download the resulting .exe file and copy it to a flash drive.


    4. Plug the flash drive to the broken laptop, and try to run the .exe contained in the flash drive.
          Some techniques - Usually on a Windows 7 (assuming the broken laptop is using one) with autoplay on by default (also assuming it's on), the first thing that should appear on the broken laptop is the autoplay dialog with 'Open Folder to View Files' focused first after you plug in the drive. So a minute after you plugged in the drive, just press enter. After that press tab 3 times and you should be at the search bar. Type in the exact name of the .exe file you copied to the flash drive, if say it's called abcde.exe, type abcde.exe then press enter. After that press down twice and press enter, the .exe program should be launched (you should hear the du du sound of UAC). After that press left once and press enter.


    5. On the broken computer, try to 'feel' your way to the 'connect' button of the program.
           Some techniques - move your mouse at different places while left clicking once at each position until you hear a chime on the broken computer. After each chime sounded, press enter and do this while working your way up vertically very slowly until the chime stopped, here you double left click.

    The broken laptop should connect to the working computer and you should be able to control it now.
    Continue reading »
  7. Simulate duplex printing on a HP printer.

    HP printers don't come with duplex printing, especially those economy ones. Canon printers have duplex printing, and it made it easier for it's users to save paper. But 'duplex printing' isn't really a hardware feature, but a software implementation.

    To duplex print on a HP printer (or any printer), say you wanna print 20 pages, at the print dialog, click 'Properties', then on the Paper/Quality tab click on 'Advanced'. At the Advanced Options dialog select 'Print Even Pages Only' on the Pages to Print drop down menu.


    Click OK, go back and start printing (yes print even pages only, don't panic there's more to come)

    After finish printing, take the whole printed pages turn it around horizontally and put it back to tray face down.

    Now click 'Properties', then on the Paper/Quality tab click on 'Advanced'. At the Advanced Options dialog select 'Print Odd Pages Only' on the Pages to Print drop down menu. Click OK and print.

    There you go, duplex print the manual way.

    If you are printing odd number of pages say 21 pages, you have to add one additional page in front of the printed even pages before 'printing odd number of pages'.
    Continue reading »
techteendaily One Line Description Avatar Logo a one place stopshop for some of your tech needs. Though this blog is not updated frequently, but it's information are still meant to be usable and feasible. As the blogger is a lazy person, and also there are no audience at the moment, so maintainence is kept to the lowest priority. If you want this blog to come alive, PLEASE TELL ME and POST COMMENTS to let me know that you care.